

|
Outdoors Growing in Hawaii
If money is an object to your existence, outdoor growing is the method I would highly recommend for producing your own medical cannabis in Hawaii.
The general idea is that once we have a plant that represents the genetics suitable for production, we perpetuate that plant by way of making clones taken from a "mother" plant which is never allowed to flower.

Quality is defined by your personal preferences.

The small clones will be created in a cloning device under artificial lighting and then transferred to a small pot once rooted.


Cloning is the secret to consistency.
We will then grow those cloned cannabis plants by placing them in the outdoor garden during the day and moving them to the artificially lighted area at night.
As the plants grow they will be transplanted into progressively larger containers up to approximately 2 gallons in size.


Once they are of a size that is favorable for initiating the flowering phase, we will transplant them a final time (usually into a 5 gallon or larger container) and simply leave them in the garden at night.

Transplanting as the plant grows will help save on space.

Hawaii's natural light cycles during winter and summer are such that it will flower marijuana plants after 1-2 weeks of exposure.
Setting up the Vegetative Solution
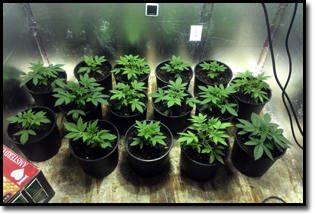
The first order of business is to establish an area (closet, room or tent) where you can run low energy lighting to perpetuate vegetative growth of the younger plants.
As the sun sets, the plants you wish to keep in the vegetative phase need to be moved inside under artificial lights.
The reason for this is that Hawaii's natural light cycle, if not interfered with in this manner, will cause plants to start flowering if exposed to the natural cycle for too long. To prevent this from happening we transfer plants that are still in the vegetative state to the artificially lighted area at night.
Types of Lighting
For this application we do not need light that is capable of producing fast growth. We just need something powerful enough to facilitate cloning. For this you can use almost any type of fluorescent lighting. T5s provide a solid platform, however, you can save a fair amount of money using regular "shop light" T12 lights than are typically sold at home improvement stores.

T5s provide a bright and compact lighting footprint but will result in a higher electrical bill than a simpler lighting system.

T12 lighting systems are cheap and simple yet very effective.
Don’t use halide lights! Not only do they put off immense amounts of heat, they're total overkill for this application. Furthermore the electrical cost will be exorbitant.


High Intensity Discharge lights are the industry standard for high-end indoor operations, however, well beyond the scope of the mission outlined in this guide.
We are not looking for the vegetative closet to do anything but perpetuate the growing cycle; it need not be a highly productive growing contraption. We have the Hawaiian sun and nature for that function.

Cannabis thrives under many different lighting setups; sometimes all that is needed is a sense of imagination.

The lighting Cycle
You could just place your plants into the veg. room after the sun goes down and simply move them back out when it is daylight again. Given that electricity will be the most expensive component in this growing solution I'd suggest cutting it in half by using a timer.


Connect the lights to the timer and have them turn off so as to give the plants no more than 6 hours of dark cycle. Plants keep transpiring in the dark, so you'll want to keep your vent fans running to avoid moisture build up in the room.
Alternatively, if you're a night owl like me, you can put the plants in the veg. area at sunset and then set an alarm for yourself for around 1am-2am to move the plants black into the outdoor garden. If you tend to sleep in during the morning hours this is how I would suggest managing the schedule, else you will have to set an alarm for sunrise, or shortly after, to move them into the outdoor area.
When taking clones you'll want to run the vegetative closet 18 hours a day.
Ventilation
This is the one element where you will have to spend some money. Do not settle for a lesser ventilation fan as you will eventually replace it with the one I'm going to recommend. The size of the fan (typically 4" or 6") is going to be determined by the size of the closet, room or tent you construct. Most modest sizes (smaller than 4'x 4'x 6') can get by on a 4" inline fan. Anything larger will most likely need a 6" solution.

I'd suggest an inline fan with sealed bearings, a balanced impeller and an extensive warranty like the ten year one offered by Vortex.
I just love these fans... a friend of mine bought a used 8" inline Vortex fan and placed it in the back of his truck. Somehow, as he was underway, the fan came out of the bed of the vehicle but the power cord wedged itself into the hinge of the tailgate resulting in the fan being towed for 30 miles along the highway tarmac, bouncing as he drove, driver unaware with rap music blasting. When he got home the fan was pretty scratched with some minor dents, however, when he plugged it in it functioned just fine; as far as I'm aware that fan is still in operation today.

Always vent from the highest point of the garden and allow for cool air to enter through the lower vents.
Vegetative Enclosure
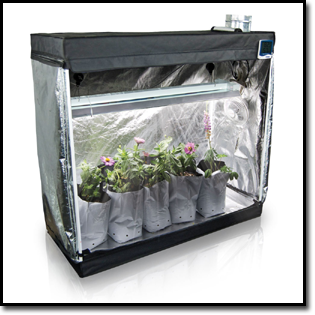
This can be just about any space that you are able to modify. A shaded lanai is a perfect spot for setting up a grow tent. Tents have come down in price (although you do get what you pay for) making them a far more attractive solution, provided you have the space for it. They already have all the ventilation fittings and hangers in place saving a lot of construction time. I use a small 2'x 4' tent with a 6 lamp T5 and a 4" Vortex fan. I have mine setup in a small lanai making ventilation very simple; air in low on one side, vent from upper region of tent out of tent, high vent, on the other side.
If your tent is setup inside you will have to engineer a venting solution to the outside. A closet with an oscillating fan in an open door will not work. It might seem to work at first, but that's only because most problems don't manifest themselves immediately. And without the experience to recognize the early signs will most likely result in various degrees of catastrophe. Do it correctly and problems will be minimal or even, possibly, non existent.
A Quick Solution Shopping List
For those who don't want to engineer this in their heads and construct something tailored to your needs, here is a shopping list that will require a space at least 2'x 5' in area and 6' tall that can be forcibly vented.
48"x 24"x 60" Grow Tent - approximately $80 on Amazon
Vortex Inline Fan, 4 inch - between $110-$140 online (pricey on Amazon for some reason)
6 bulb 4' T5 lamp with vegetative (6500K) tubes - approximately $140 on Amazon
A pair of ratchet lamp hangers - approximately $6 on Amazon
4" dryer ducting - approximately $10 on Amazon
4" duct clamps - approximately $7 on Amazon for qty of 4
Duct tape - approximately $4 on Amazon
Surge protector power strip - - approximately $20 on Amazon
Grounded 24 hour timer - approximately $9 on Amazon
EZ Clone 16 site (BL-16) - approximately $130 on Amazon
And then depending on where you are setting up you may need a heavy duty extension cord.
The Outdoor Area
You'll need to setup an area in your yard that you can restrict access to and that is not readily visible by your neighbors or passers by. To do this may require a little imagination. You can setup shade cloth or even plant other plants to act as a visual barrier from the directions that are possibly compromised. As long as you can restrict who has access to the plants and nobody can see them as well as possessing the appropriate medical allowances using the plant tags as prescribed by the state your garden will be entirely legal.
I'm going to suggest starting out by using a 4 plant harvest cycle. This will require a minimum of 36 square feet of garden area that receives your best sun exposure, two thirds of which will be reserved for the 4 flowering plants. The smaller plants and mothers don't need as much space. The 4 plant cycle allows you a mother plant, four flowering plants and four plants being reared for flowering with one plant number in reserve (per license holder/caregiver).
Dealing With the Hawaiian Rain
Once flowering cannabis plants start to reach maturity (assuming all went according to plan) the buds will start stressing the weight capabilities of the stems they are growing on. Should it rain all the small crevices on the buds will fill with water adding many more ounces of weight the plant may not be prepared to handle. This often results in the largest buds being snapped from the plant before they have an opportunity to reach their full potential.

To aid the ability of the plant's infrastructure we can add stakes and using garden ties to add strength to vulnerable branches. Bamboo stakes work well for this purpose. Trim them to match the height of the plant so that your plants remain easily manageable.
Hawaii is also very capable of producing "biblical rain". Hard falling rain droplets can wash resin glands straight off the plant; obviously a result counter to what we are trying to accomplish. As such one would always be cognizant of the weather. If possible move maturing plants into a sheltered area so that you do not get rained on.

Rain is the giver of life in the Islands but can be detrimental to cannabis buds.

Rainfall is pretty predictable during the winter months, very often raining at night.

I use a small portable greenhouse ($70 on Amazon) to move my older plants into at night and then move them back out when the risk of rain has passed in the morning.
